The Motivation
I’ve explained this before, but I wanted to share my extensive certification vendor list with those that might benefit from it. I was maintaining a simple list in Google Docs. And it just kept growing, and growing, and growing.
I also wanted to have my own personal site, so this was the other major reason. If you want to build your own site, start with just a personal one. Maybe add a blog. Host your resume. Talk about projects you’re working on. That’s more than enough material for building out a simple personal site like this one.
The Beginning
Once you know roughly what you want to put on your website, you then have to figure out how you want to build it. Before we even talk about page design, styles, and fonts, we need to talk about frameworks and libraries.
This is the most important step. Everything else after this part is smooth sailing, more or less.
For this site, I used a Bootstrap framework. To take it one step further, I used a template built upon the Bootstrap framework. Here is a link to that template. It’s also linked in the footer of this site.
Spend some time going through the code line by line. It’s important to understand what each section does and how it affects the site. Since it’s just HTML/CSS/JS, you can “run” this locally on your PC by just opening the index.html file in your browser. Make some changes to the style.css and see how it affects the site. Experimentation is helpful in understanding how the code gets rendered in the browser.
If you want to use something more modern than Bootstrap, there is always React and Angular. If you want to go down this route, then consider using Vite. That can help you get started. I’m working on a React project now. It’s much more complicated than Bootstrap, FYI.
The Design
The best part about using a template is that the design is mostly squared away. The big things that I changed were the colors and the fonts. I tweaked most everything else, but this site is still very similar to the template.
Templates are often designed to address multiple use cases. Because of this, there are some pieces of the code that are not going to be used. Spend some time removing what you don’t want to use. This will help simplify the design process.
Some resources that really helped me pick out colors, stock photos, icons, and more are included below:
This part can take a while. I must have spent a week from the moment I downloaded the initial template to having it look mostly how it does today. It’s a process! It can feel extremely overwhelming at times. If you get frustrated, just take a walk and come back to it later. Even with a template, redesigning a site can be a challenge.
Going Live
If you want to host it on the Internet, you’ll need to do a couple things. AWS makes all of those easier, as do the other public cloud providers. I used AWS, so that’s what I’ll be talking about.
If you don’t have an account yet, go ahead and sign up for one. It’ll cost less than $20 a year to host a site on AWS. Setting up a new account is really simple too! I could explain how I did this, but let me just refer you to how AWS documents it: Configuring a static website on Amazon S3.
Here’s what you need:
- Domain registration
- Website hosting
- Search engine verification (optional)
- Content delivery (optional)
Domain Registration
AWS’s Route 53 can be used to register a domain name. This part is really simple. However, I had a weird permissions issue that was preventing me from registering a new domain. I was able to quickly sort it out with support. You may run into the same issue!
Website Hosting
Since this is just a static site, Amazon S3 is perfect. It also integrates seamlessly with their content delivery network, called CloudFront. All you need to do is upload the static site files to a bucket with the same name as your Route 53 hosted zone.
Search Engine Verification
There are some steps that are required to verify with search engines that we own the website. I added a record from Google in my Route 53 domain for this site that would confirm my ownership of it. From there, you have some options in helping the site’s SEO (search engine optimization).
Content Delivery
Not required, but it’s cheap to use and makes the website extremely responsive in specific geographic regions that we choose.
Modernizing the Site
It is not efficient to manage over fifty individual HTML pages, CSS sheets, and JavaScript files. As the site grows, this can become unbearable. Want to update the header values? Good luck doing that on all of those various HTML pages.
Want to make a new blog post? This would be a nightmare to create using just HTML. Instead, I’m typing this out using Markdown, which is almost identical to using a word processor like Microsoft Word or Google Docs. In fact, let me show you how this page looks to me as I write this post. I’m using Notepad++, which recognizes Markdown code and makes formatting things in bold and italics particularly easy. I also added a spellchecker plugin called DSpellCheck!

Enter the SSG. Static site generators help make managing static websites extremely easy. For this site, I chose Jekyll.
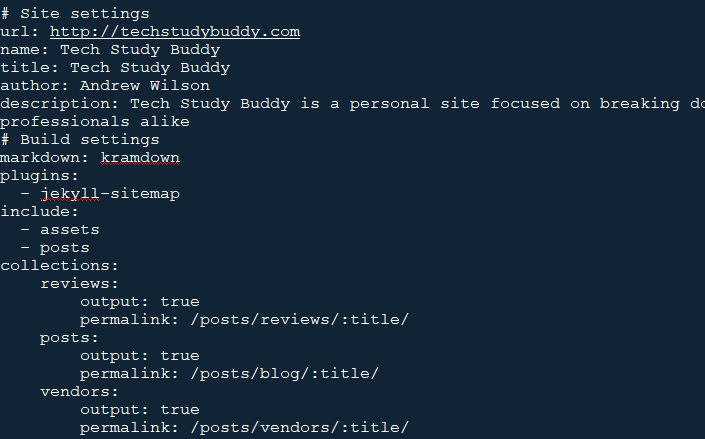
I then basically took the entire site apart. I broke the site into individual components. The head, header, and footer from each page was removed. A single file for each component is then created. In Jekyll, these go into the _includes folder. I also configured how the site will be structured in a YAML config file. If it sounds complex, it isn’t. Mine is relatively simple!
The HTML is then broken down even further using layouts, which go in the _layouts folder. The most basic layout is usually called the default layout. This is what every page will need. This is where I specify my head, header, footer, and scripts.
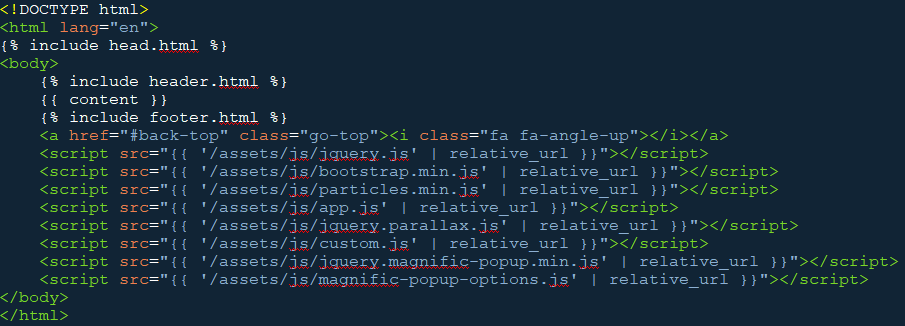
From here, I kept breaking things down. What does each individual page need? The homepage is different, so that’ll need its own layout. Each blog post should follow this format, so let’s add a layout for that. Layouts will extend other layouts. For example, the most fundamental one is the default layout.
In my site, it goes like this: default < page < post. At the same level of page is also the layout page for the individual sections that only extend the default layout. Finally, the individual Markdown pages (like this one) will extend the post layout. So now if I wanted to change the header or footer, I only need to change that singular component under the _includes section, which then will get picked up by the default layout, which then will get picked up by the page layout, which then will get picked up by the post layout, which then will get automatically applied to this post’s page as well as all of the others once I execute a Jekyll build command that generates the static website files.
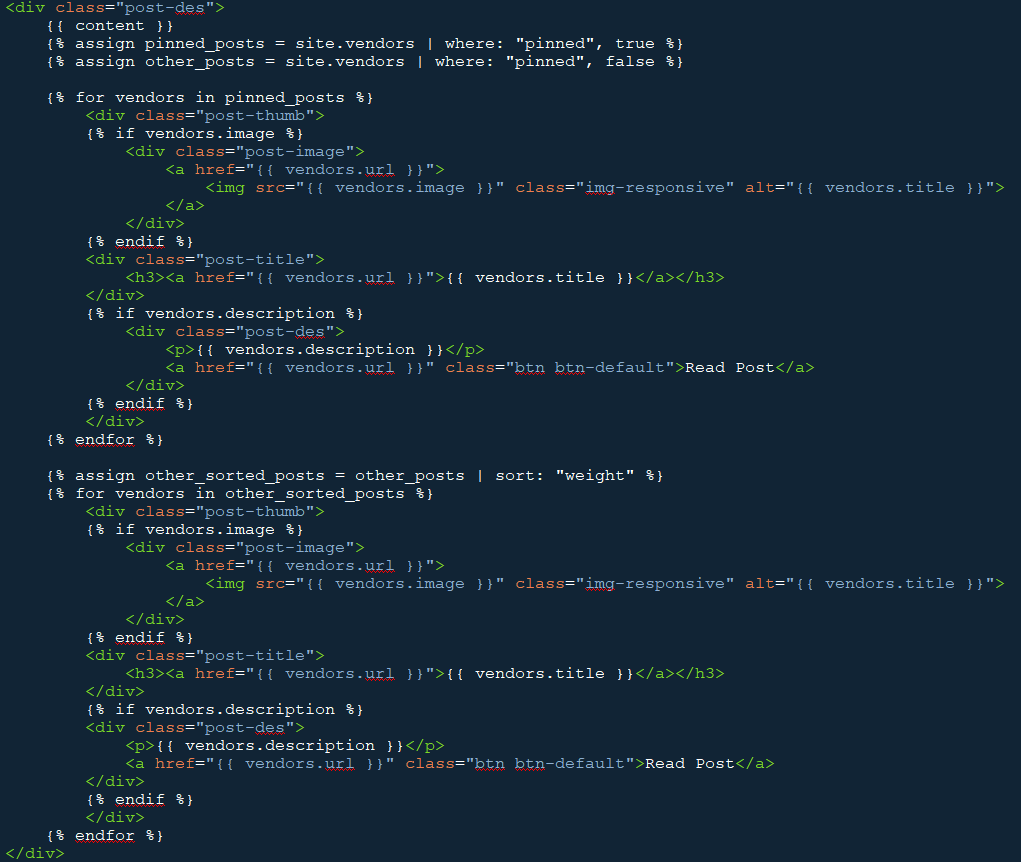
Each section in my site has its own specific layout page, because I want each section to display the posts differently. For example, I wanted to display the posts under the Vendors section in a specific way. In hindsight, I didn’t need to include both pinning and weight, but at the time that section was more complicated than it is now.
I would recommend doing all of this after settling on a design. I find it to be easier changing the initial template and testing things out locally before having to frequently build and serve the site with an SSG. Instead of simply opening an HTML page to test our changes live, we will have to run some specific Jekyll commands that creates a local webserver for testing.
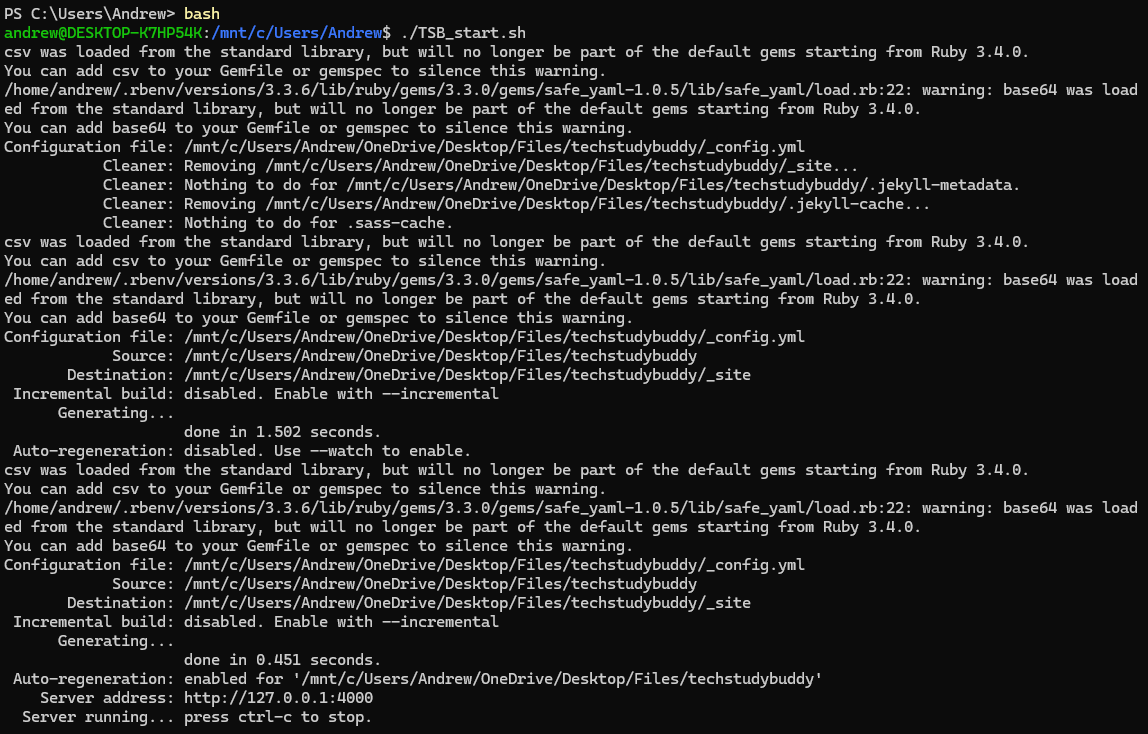
This will then translate all of the code into static site files, which go under the _site folder. From here, we can upload the files and folders it generates to S3.
Maintenance
At this point, this site is basically complete. Now it’s just about adding new blog posts, reviews for certifications that I complete, and updating the certification vendors list.
Once you get your personal site hosted, make sure you update it every now and then! Add a new blog post, or make sure your resume is current if it’s hosted on your site.
If you have any questions, please reach out!